> For the complete documentation index, see [llms.txt](https://docs.novacura.com/flow-development-guidelines/llms.txt). Markdown versions of documentation pages are available by appending `.md` to page URLs; this page is available as [Markdown](https://docs.novacura.com/flow-development-guidelines/developing-a-flow/flow-elements.md).
# Flow Elements
There are certain design elements to consider when using flow elements. Following these guidelines will help you to develop a standardized flow.
## Start Step
Start Step plays a important role for Fragments since all input parameters for the fragment is defined using the Start Step.

This feature is important when developing template flows. A **"Template Flow"** is something that can be reused as a solution or as fragment of another larger flow.
A good example would be, a Register Arrivals flow that you build for IFS Applications. Ideally this can be run as a separate flow. However, it can also be one option in a larger flow which has Purchase Order creation, release and receipt. By building the Register Arrivals flow as a template flow, it gives the flexibility to quickly plug-and-play this flow to any other flow. To make this possible, it is recommended to use the following method when developing template flows.
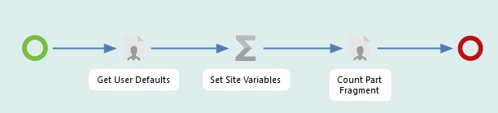
Build the solution insider a Fragment with start step having all required variables defined. Create a End User Flow with an Included Workflow to hold this fragment as shown below. This gives the added flexibility of re-using this Included Workflow step by simply copy-paste.
## User Step
User Step has multiple elements which has its own configurations. There are certain key features that you should be aware of when designing a flow.
### Text Inputs
Text Input element has a parameter called **Keyboard Type**. This decides what should be the keyboard layout to open in the mobile apps when a field is selected. Thus, it is important to select the correct Keyboard Type based on your input field.

### Check Box
The Default Value and the returning Target Variable value of a Check Box can be handled by using either of following Boolean method. However, if you use any label field to display a Check Box value, it will be shown either as "True" or "False".
| When Checked | When Unchecked |
| ------------ | -------------- |
| 1 | 0 |
| TRUE | FALSE |
| True | False |
| true | false |
### Data Grid
* When defining columns in the **Edit Columns** window, following points needs to be taken into consideration.
* All columns that should be included in the Target Variable table need to be added to the Data Grid columns as **Include in Output** check box needs to be checked for each column.
* If you don’t want to show certain columns in the client, set them to **Hidden**.
* For columns that can be edited with the **Show As** option set to **"Value List"**, you have the possibility to restrict the selection in the value list based on values in other fields by adding a WHERE condition to the **Table Expression**.
* Use color coding to highlight columns using **Cell Color** for better user experience. Use CASE WHEN conditions for conditional formatting. E.g.: Use a Cell Color to highlight editable columns if there are some editable columns.
* Pay attention to the **Size Mode** and **Size** used on fields and consider your targeted device (mobile/web).
* Use field type **"Computed"** in **Show As** to automatically calculate and set a value in a field based on a selection in another field. The data to filter through has to be pre-fetched for the user step, so this has limited usability if the values in the field have a lot of possibilities.
* **Use Change Tracking** is used to identify changes that are done in a Data Grid input. When this option is enabled, the Target Variable table will have an additional column called **RowState** and this can be used to filter for new, changed or deleted rows afterwards using WHERE condition. If you want to have the same variable name as **Source** table for the Target Variable table, remember to add the additional column as "RowState" to the table definition and keep the default value as 'Unchanged'.
* If the **Row Selection Mode** is set to select one or multiple lines, the Target Variable table will have an additional column called **IsSelected**. If you want to have the same variable name as **Source** table for the Target Variable table, remember to add the additional column as "IsSelected" to the table definition with no default value.
* Use color coding to highlight lines using the **Item Style** field for better user experience. Use CASE WHEN conditions for conditional formatting.
### Sub-Tasks
When choosing between using fragments or sub-tasks (or using sub-tasks with fragments), it is good to be aware of some limitations that exist with sub-tasks:
{% hint style="info" %}
There is no refresh of data happening at the top user step when the sub-task data entry is completed.
{% endhint %}
{% hint style="info" %}
If using **Check List Sub-Tasks**, the item gets checked when coming back up no matter what happened in the sub-task flow. So, even if the user exits a sub-task, it gets checked as "done" in the top user step.
{% endhint %}
### History
Always user the **Historical** function to explain the past user steps in the history view. Target Variables entered in the User Step can be used in the History **Text** or in **History Details** as additional information. Also you can hide certain steps from history by unchecking the **Show in History** checkbox. When the history is not filled the default text label shown in history is "User Step" making it difficult for the user to use the history function to identify the correct history step to navigate back.

If History is properly configured, History will look as follows.

### Pinned User Step
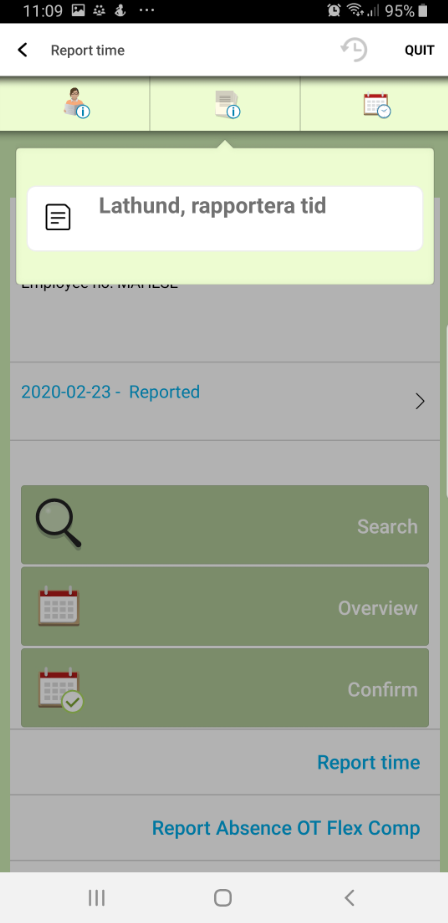
**Pinned** info is read-only information. It's useful for showing additional information as the workflow moves forward. In the example below, pinned info is used to show an instruction for time reporting to the user (or users):
 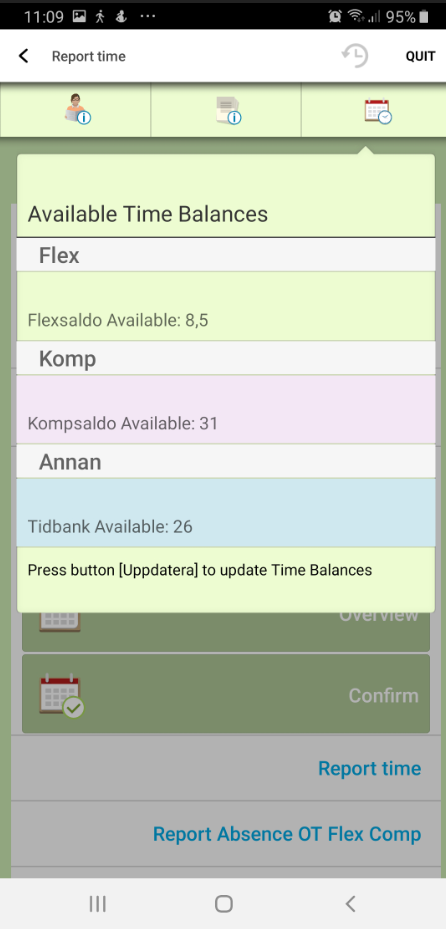
The pinned info is automatically updated the next time the same pinned user step is passed. It can also be updated manually via a button (outgoing arrow) that refreshes both the dataset and pinned info, or via a user step before the user step with a "Refresh" button.
## Buttons
The **Priority** of the buttons determines the order in which they should be displayed. It can be a little tricky, especially if they have conditions to know which button comes where. A tip is to set the priority to 10, 20, 30 (rather than 1, 2, 3) if you have many buttons in a user step, allowing addition of more steps in the middle if needed without renaming all other steps. Remember to check **Default** option if there are selected path to proceed which enables the user to proceed to the next step using keyboard or scanning device "Enter" buttons.

## Machine Step
Machine step configuration changes based on the Connector selected on the header.
### SQL Query Machine Steps
{% hint style="info" %}
Always define machine steps with **Database Call Type** set as **"SQL Query"** sitting outside the main flow connected via a **Data Arrow**. If such machine step is added directly in the flow and if the SQL query returns no values, this steps throws a runtime error failing the flow process.
{% endhint %}

### Client Massages

A **Client Massage** can be configured in machine steps which appears to the user when that machine step is executed. This is a good way of letting the user know what is happening in the background until the user sees the next User Step. Client messages appears directly in the mobile device screen, but on the web client it will not be directly visible. However if you check the history in the web client, you can see the client messages recorded there.

## Assertion Step
{% hint style="info" %}
It is recommended to add descriptive **Error Messages**, using flow variables when possible. Can be used to check user input. Flow script can be used for more complex verifications, i.e. formats like email address.
{% endhint %}
## Assignment
{% hint style="info" %}
When using the **First** flow function, you have to be sure you will find a record. If you record availability is uncertain, empty records scenario needs to be handled using the following script to avoid flow errors.
{% endhint %}
```sql
CASE WHEN Count(.....) > 0 THEN First(....) ELSE .... END
```
## Table
It is recommended to use flow **Tables** only to maintain static low value data. Ideal option would to create a static list of values. For dynamic data, it is recommended to use either a database table or a flow property table as an alternative.
{% hint style="info" %}
If you wish only to define a empty table, that can be done using a **Assignment** step using a function like
Table(Column1, Column2, ...)
{% endhint %}
{% hint style="info" %}
Tables can be creating a slow **Script** step as well. Script steps gives more flexible handling of table data in a single step.
{% endhint %}
## Checkpoint
Checkpoints are used as information messages that temporary messages that appears and fades away without an user action. This is ideal for flows what are targeted to be used in mobile or scanning devices. A checkpoint can be ideally added after a machine step before the end step to inform the user action has being performed. It can be also used before a swimlane handover.
Below is how a checkpoint looks in the flow android client.

## Split
{% hint style="info" %}
Spit is required to be used when you want to either split work into multiple swim lanes or in offline flows to initiate offline transactions.
{% endhint %}
## Log point
Log points need a separate SQL database together with the system event log point. When a log point is used in a workflow, it can save all the data and variables available at the position of the log point. Here is an example of an initial log point when the workflow is started and a new log point when the workflow is re-started:

Log points can be used to:
* Debug and trace errors in a workflow.
* Measure how fast/slow a workflow is running (when using an initial log point in the beginning of the workflow and log points at the end of the workflow) or if it starts over again in a loop.
* Audit performance and usage of both Flow users and workflows.
Here is an example of different SQL queries used to extract information from the SQL database where all log point transactions are saved:

## Annotation
{% hint style="info" %}
Use annotations to explain complex logic and, if applicable, to reference documented requirements. This can become very helpful when other resources/support is required to work on the same flow.
{% endhint %}

## Included Workflow
Included Workflow step is used to connect fragments to a flow. When doing the **Variable Mapping** if you have tables/records as inputs, column names of the mapped table/record should match exactly to the table/record columns defined in the fragment flow.
{% hint style="info" %}
When there are new versions in the fragment, that latest **Workflow Version** needs to be remapped to the Included Workflow. This can be done directly by the Fragment flow or by manually modifying the Included Workflow step, see [Fragment](/flow-development-guidelines/developing-a-flow/workflow-types.md#workflow-fragments).
{% endhint %}
{% hint style="danger" %}
Do not leave the Target Variable name empty in a Included Workflow. This is not highlighted as a error during version commit, but raises issue when running the flow.
{% endhint %}

## End Step
You should always include an end step in your flow. Some Flow features, like monitoring or starting a another flow at the finish of one flow require an end step in the flow.
## Flow Properties
Global or user variables are added as properties in the **Environment** tab. Global variables contain data that is shared for all users. For user variables, the data is connected to a specific user.
{% hint style="info" %}
Use global variables can be used in place of hard-coded values within a workflow. This is useful when subscription is used to set correct values depending on environment. e.g.: IFS Applications URL.
{% endhint %}
{% hint style="info" %}
The variables must have the same name in all Flow instances if subscription is used.
{% endhint %}
{% hint style="info" %}
Global variables are only updated/read when the user logs in. If frequent updates are needed, consider using the Flow connector to read the values. Flow properties are intended for small amounts of data and are not a database replacement.
{% endhint %}
## Version Comments
Add version comments to document major changes to a flow. This can be made mandatory to enter using the **Force Commit Message** option in **Workflow metadata** window.

---
# Agent Instructions
This documentation is published with GitBook. GitBook is the documentation platform designed so that both humans and AI agents can read, navigate, and reason over technical content effectively. Learn more at gitbook.com.
## Querying This Documentation
If you need additional information that is not directly available in this page, you can query the documentation dynamically by asking a question.
Perform an HTTP GET request on the current page URL with the `ask` query parameter, and the optional `goal` query parameter:
```
GET https://docs.novacura.com/flow-development-guidelines/developing-a-flow/flow-elements.md?ask=&goal=
```
`ask` is the immediate question: it should be specific, self-contained, and written in natural language.
`goal` is optional and describes the broader end goal you are ultimately trying to accomplish on behalf of the user. GitBook uses it to tailor the answer towards what is most useful for that goal.
The response will contain a direct answer to the question and relevant excerpts and sources from the documentation.
Use this mechanism when the answer is not explicitly present in the current page, you need clarification or additional context, or you want to retrieve related documentation sections.